Battery switch on travel trailer function is crucial for managing your RV’s power. Understanding how it works—from the different types of switches available to troubleshooting common problems—is key to preventing electrical issues and maximizing battery life. This guide will walk you through everything you need to know, from basic operation to advanced integrations with solar panels and inverters, making your RV adventures smoother and more reliable.
We’ll cover the various types of battery switches, their advantages and disadvantages, and how to choose the right one for your setup. We’ll also delve into the specifics of operating your battery switch safely, including essential safety precautions. Finally, we’ll explore troubleshooting, maintenance, and integration with other RV systems like solar panels and inverters.
Battery Switch Types in Travel Trailers
Choosing the right battery switch for your travel trailer is crucial for managing your power sources efficiently and safely. Different types of switches offer varying levels of control and complexity, catering to different needs and setups. Understanding these differences will help you make an informed decision.
Single Battery Switches
A single battery switch is the simplest type, typically found in trailers with a single 12-volt battery. It’s a simple on/off switch that connects or disconnects the battery from the trailer’s electrical system. This provides basic battery protection, preventing accidental drain when the trailer isn’t in use. However, it lacks the flexibility to manage multiple batteries or isolate specific circuits.
Dual Battery Switches
Dual battery switches are designed for trailers with two batteries, often a house battery and a starting battery. These switches allow you to isolate each battery independently, charge them separately, or combine them for increased power. This setup is common in trailers that use significant power from the house battery for appliances and lights, while the starting battery powers the vehicle’s engine.
So, you’re an audiophile who loves to travel? Awesome! Check out this guide on creating the perfect audiophile travel setup to ensure your ears are always happy on the go. And don’t forget to sort out your travel insurance before you jet off; getting Aon travel insurance is a smart move for peace of mind, especially if you’re carrying expensive gear.
Planning ahead makes for a much smoother, more enjoyable trip, so get those details sorted before you pack your bags!
The advantage is the ability to maintain both batteries independently, extending their lifespan. The disadvantage is that it requires a bit more understanding of battery management.
Multi-Stage Battery Switches
Multi-stage battery switches offer more advanced control over multiple batteries. These switches often include multiple positions allowing for different combinations of battery usage. For instance, a three-position switch might allow you to use only the starting battery, only the house battery, or both combined. Some more sophisticated switches even include a “battery combining” mode for starting and running simultaneously from multiple batteries.
The increased complexity allows for better battery management and more efficient power usage but adds to the cost and learning curve.
Comparison of Battery Switch Types
| Feature | Single Battery Switch | Dual Battery Switch | Multi-Stage Battery Switch |
|---|---|---|---|
| Number of Batteries Supported | One | Two | Two or More |
| Level of Control | Basic On/Off | Independent control of two batteries | Multiple combinations of battery usage |
| Cost | Low | Medium | High |
| Suitability | Small trailers with minimal power needs | Trailers with separate house and starting batteries | Large trailers with complex electrical systems and multiple batteries |
Operating Procedures for the Battery Switch: Battery Switch On Travel Trailer Function

Safely operating your travel trailer’s battery switch is crucial for protecting your batteries and electrical system. Understanding the proper procedures will ensure a longer lifespan for your batteries and prevent potential damage to your RV’s electrical components. This section Artikels the steps involved in safely connecting and disconnecting your house batteries.Properly using your battery switch involves a straightforward process, but safety should always be your top priority.
Remember that working with batteries involves potential hazards like electrical shock and explosions if not handled correctly.
Connecting House Batteries to the Charging System
To connect your house batteries to the charging system, first ensure the switch is in the “OFF” position. This prevents accidental short circuits. Then, carefully move the switch to the “ON” position. You should now see your house batteries charging, indicated by a charging light on your battery monitor or by a multimeter reading voltage across the battery terminals.
Always check your battery voltage regularly to ensure the charging system is functioning correctly. If you notice anything unusual, such as low voltage or excessive heat from the batteries, immediately disconnect the batteries by turning the switch to the “OFF” position.
Disconnecting House Batteries from the Charging System
Disconnecting your house batteries is just as important as connecting them. Before disconnecting, turn off all appliances and electronics powered by the house batteries. This prevents any residual drain and protects against potential surges. Once everything is switched off, carefully move the battery switch to the “OFF” position. This completely isolates the batteries from the charging system and other electrical components in your RV.
This is a vital step for long-term storage or when leaving your travel trailer unattended for extended periods.
Safety Precautions When Using the Battery Switch
Safety should always be your primary concern when working with batteries and electrical systems. Here’s a list of important precautions to follow:
- Always wear appropriate safety glasses to protect your eyes from potential sparks or acid splashes.
- Wear gloves to protect your hands from battery acid and potential electrical shocks.
- Never work on the battery switch or batteries in a confined or poorly ventilated space. Battery gases can be explosive and harmful.
- Ensure the switch is firmly in the “ON” or “OFF” position. A partially engaged switch can cause arcing and damage to the system.
- Inspect the battery switch and connections regularly for corrosion or damage. Clean any corrosion immediately with a wire brush and baking soda solution.
- If you are unsure about any aspect of the procedure, consult a qualified RV technician.
- Always refer to your RV’s owner’s manual for specific instructions regarding your battery switch and electrical system.
Battery Switch and Solar Panel Integration
Integrating solar panels into your travel trailer’s power system enhances your off-grid capabilities, but proper integration with your battery switch is crucial for safe and efficient operation. The battery switch acts as a central control point, allowing you to manage power flow from both your solar panels and your tow vehicle’s charging system. Understanding this interaction is key to maximizing your solar energy usage and preventing potential damage to your batteries or other components.The battery switch manages power from both the solar panels and the tow vehicle by acting as a disconnect or selector.
When the switch is in the “on” position, it allows current from the solar panels to charge your batteries. Simultaneously, when connected to shore power or your tow vehicle, the charging system from either source will also charge your batteries. The switch prevents accidental short circuits or unintended power flow when you disconnect from shore power or your tow vehicle.
This ensures your batteries remain protected and your system functions as intended. If the switch is turned off, it completely isolates the batteries from both the solar panels and any external charging sources, preventing accidental discharge or damage.
So, you’re an audiophile who loves to travel? Awesome! Check out this guide on creating the perfect audiophile travel setup to make sure your tunes sound amazing on the go. Before you jet off, though, remember to sort out your travel insurance! Getting Aon travel insurance is a smart move; peace of mind is priceless, especially when you’re carrying expensive headphones.
Having both sorted will ensure you have an amazing, worry-free trip filled with great sound!
Solar Panel Wiring Configuration with Battery Switch
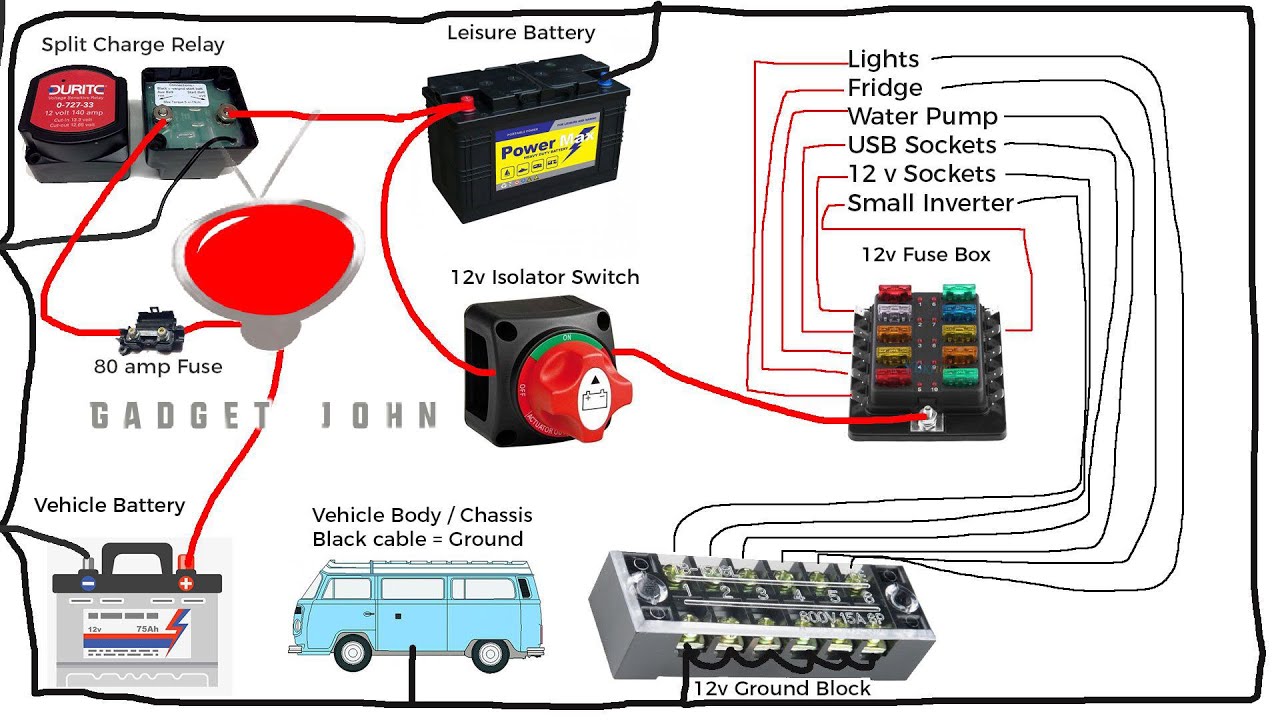
Imagine a simple diagram. We’ll start with the solar panels themselves. Let’s say you have two panels. Each panel has two wires coming from it: a positive (+) and a negative (-). These wires from each panel are combined, usually through a combiner box, which simplifies the wiring to a single positive and a single negative cable.
This combined positive and negative cable runs to a solar charge controller. The charge controller regulates the voltage and current from the solar panels to prevent overcharging your batteries. The output of the solar charge controller (positive and negative wires) then connects to one side of your battery switch. The other side of your battery switch connects directly to your battery bank’s positive and negative terminals.
Finally, your tow vehicle’s charging system (also positive and negative wires) connects to a separate set of terminals on the battery switch, usually labeled for this purpose. A properly wired system will include fuses or circuit breakers at various points to protect against overcurrent situations. The battery switch itself will have different positions (e.g., “off,” “solar,” “tow vehicle,” “both”), allowing you to selectively engage or disengage power from the solar panels and tow vehicle charger.
This prevents conflicts and protects your system’s components.
Battery Switch Maintenance and Replacement
Keeping your travel trailer’s battery switch in good working order is crucial for reliable power. Regular maintenance prevents unexpected failures and ensures your batteries are properly managed, maximizing their lifespan and preventing potential damage to your electrical system. Neglecting maintenance can lead to costly repairs or even dangerous situations.Regular maintenance is straightforward and doesn’t require specialized skills. By following a simple routine, you can significantly extend the life of your battery switch and avoid the inconvenience and expense of a premature replacement.
Replacing a faulty switch, while also relatively simple, is a crucial step in restoring reliable power to your RV.
Routine Battery Switch Maintenance
A little preventative care goes a long way. Regular inspection and cleaning are key to preventing corrosion and ensuring smooth operation.
- Visual Inspection: Once a month, visually inspect the switch for any signs of corrosion, loose connections, or damage to the casing. Look closely at the terminals for any buildup of white, powdery residue (corrosion).
- Cleaning: If corrosion is present, use a wire brush or sandpaper to carefully clean the terminals and surrounding areas. A baking soda and water paste can also help neutralize corrosion. Always disconnect the battery before cleaning.
- Tightening Connections: Check the tightness of all terminal connections. Loose connections can lead to overheating and failure. Use a wrench to tighten them securely, but avoid over-tightening.
- Lubrication (Optional): Apply a thin layer of dielectric grease to the terminals after cleaning to prevent future corrosion. This helps repel moisture and keeps the connections clean.
Battery Switch Replacement Procedure, Battery switch on travel trailer function
Replacing a faulty battery switch is a relatively simple process, but it’s important to follow safety precautions.
- Disconnect the Battery: This is the most crucial step. Disconnect both positive (+) and negative (-) terminals from your battery. This prevents accidental shorts and protects you from electrical shock.
- Remove the Old Switch: Locate the battery switch. It’s usually found near the battery compartment. Carefully remove any screws or fasteners securing the switch to the mounting surface. Note the wiring configuration before disconnecting the wires.
- Install the New Switch: Mount the new switch in the same location as the old one. Ensure that it’s securely fastened. Connect the wires according to the diagram from your old switch or the instructions included with the new switch. Double-check your connections before proceeding.
- Reconnect the Battery: Once you’ve confirmed all connections, carefully reconnect the battery terminals. Start with the positive (+) terminal first, then the negative (-) terminal.
- Test the Switch: Turn the switch on and off to verify proper operation. Check your trailer’s electrical systems to ensure everything is working correctly.
Recommended Tools and Replacement Parts
Having the right tools and parts on hand makes the job easier and faster.
- Wrench(es): Appropriate size(s) to fit the battery terminals and switch mounting screws.
- Screwdrivers: Phillips and flathead, depending on the switch’s mounting hardware.
- Wire Brush or Sandpaper: For cleaning corroded terminals.
- Dielectric Grease: To prevent future corrosion.
- Replacement Battery Switch: Choose a switch with the appropriate amperage rating for your system. Check the specifications of your old switch to ensure compatibility.
- Safety Glasses and Gloves: Always prioritize safety when working with electricity.
Battery Switch and Inverter Interaction
Your travel trailer’s battery switch and inverter are key components working together to power your appliances. Understanding their interaction is crucial for safe and efficient operation. Improper interaction can lead to damaged equipment or even fire hazards.The battery switch acts as a master control, disconnecting or connecting your trailer’s house batteries from the rest of the electrical system.
The inverter converts the DC power from your batteries into AC power, necessary to run most household appliances. Essentially, the inverter needs the battery switch to be “on” to access the power source.
Inverter Power Source Selection
The inverter’s power source is determined by the position of the battery switch. When the switch is in the “off” position, the inverter has no power source and won’t function. In the “on” position, the inverter draws power directly from the house batteries. Some inverters also have a bypass switch, allowing you to run appliances directly from shore power or a generator, bypassing the batteries and the inverter completely.
This bypass is usually used when you’re connected to an external power source.
Consequences of Improper Interaction
Incorrect wiring or improper operation can lead to several problems. For example, if the inverter is drawing power while the battery switch is inadvertently turned off, you won’t notice any immediate issue, but it could damage the inverter or lead to a dangerous voltage drop within the wiring system. Conversely, if the battery switch is left on and the inverter is overloaded, it could drain your batteries rapidly, leaving you without power.
In severe cases, a short circuit caused by faulty wiring could lead to a fire.
Correct Wiring Configuration
A typical setup involves a dedicated wire running from the battery switch’s output to the inverter’s input terminals. This wire should be appropriately sized for the inverter’s current draw (this information is specified in the inverter’s manual – always consult it!). The wire should be protected with a fuse or circuit breaker placed as close as possible to the battery switch.
This protects the wiring and the inverter from overcurrent situations. The inverter itself should also have internal protection such as overcurrent and overtemperature shut-off mechanisms. It is crucial to use appropriately sized and rated wiring to handle the expected current. Using undersized wiring can cause overheating and potential fires. A correctly sized wire will be flexible enough to manage, and the insulation will remain intact during normal operation.
Mastering your travel trailer’s battery switch is a fundamental skill for any RVer. By understanding its function, proper operation, and potential issues, you can ensure a reliable power supply for all your onboard appliances. This guide has provided a comprehensive overview, empowering you to confidently manage your RV’s electrical system and enjoy worry-free adventures on the road. Remember regular maintenance and safe operating procedures are key to preventing problems and extending the life of your battery switch and batteries.
General Inquiries
What happens if my battery switch fails?
A failed battery switch can prevent you from charging your batteries or powering your appliances. You might experience complete power loss or intermittent power issues. Replacement is usually necessary.
How often should I check my battery switch?
Inspect your battery switch visually for corrosion or loose connections at least once a year, or more frequently if you use your trailer often in harsh conditions.
Can I use a battery switch with lithium batteries?
Yes, but you need a battery switch specifically designed for lithium batteries. Standard switches may not be compatible and could damage the lithium battery system.
How do I know which size battery switch I need?
The size of the battery switch depends on the amperage of your battery bank and other electrical components. Check your trailer’s documentation or consult a qualified RV technician.
